TOP Contributors

  1. MIKROE (2784 codes)
  2. Alcides Ramos (405 codes)
  3. Shawon Shahryiar (307 codes)
  4. jm_palomino (133 codes)
  5. Bugz Bensce (97 codes)
  6. S P (73 codes)
  7. dany (71 codes)
  8. MikroBUS.NET Team (35 codes)
  9. NART SCHINACKOW (34 codes)
  10. Armstrong Subero (27 codes)

Most Downloaded

  1. Timer Calculator (141697 times)
  2. FAT32 Library (74777 times)
  3. Network Ethernet Library (59216 times)
  4. USB Device Library (49226 times)
  5. Network WiFi Library (44999 times)
  6. FT800 Library (44536 times)
  7. GSM click (31200 times)
  8. mikroSDK (30103 times)
  9. microSD click (27586 times)
  10. PID Library (27540 times)
Libstock prefers package manager

Package Manager

We strongly encourage users to use Package manager for sharing their code on Libstock website, because it boosts your efficiency and leaves the end user with no room for error. [more info]

< Back
mikroSDK Library

UT-S 7 SEG R click

Rating:

0

Author: MIKROE

Last Updated: 2018-01-21

Package Version: 1.0.0.0

mikroSDK Library: 1.0.0.0

Category: LED segment

Downloaded: 6037 times

Not followed.

License: MIT license  

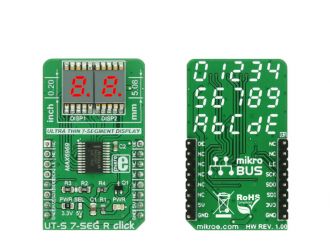
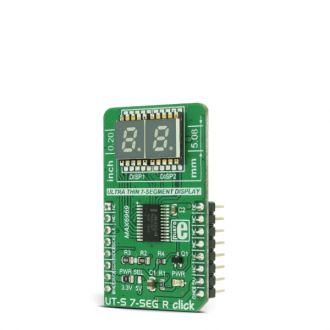
UT-S 7 SEG R click uses two SMD ultra-thin DSM7UA 7-SEG LED displays, made with the patented technology that delivers thickness of only 2.1 mm. These displays are driven by the MAX6969, a constant current LED integrated driver from Maxim Integrated, which uses the SPI serial interface for communication.

No Abuse Reported

Do you want to subscribe in order to receive notifications regarding "UT-S 7 SEG R click" changes.

Do you want to unsubscribe in order to stop receiving notifications regarding "UT-S 7 SEG R click" changes.

Do you want to report abuse regarding "UT-S 7 SEG R click".
  • mikroSDK Library 2.0.0.0
  • Comments (0)
DOWNLOAD LINK RELATED COMPILER CONTAINS
mikroBasic PRO for ARM
  • lib
  • src
  • exa
  • hlp
  • hex
  • sch
  • pcb
  • doc
mikroBasic PRO for AVR
  • lib
  • src
  • exa
  • hlp
  • hex
  • sch
  • pcb
  • doc
mikroBasic PRO for dsPIC30/33 & PIC24
  • lib
  • src
  • exa
  • hlp
  • hex
  • sch
  • pcb
  • doc
mikroBasic PRO for FT90x
  • lib
  • src
  • exa
  • hlp
  • hex
  • sch
  • pcb
  • doc
mikroBasic PRO for PIC
  • lib
  • src
  • exa
  • hlp
  • hex
  • sch
  • pcb
  • doc
mikroBasic PRO for PIC32
  • lib
  • src
  • exa
  • hlp
  • hex
  • sch
  • pcb
  • doc
mikroC PRO for ARM
  • lib
  • src
  • exa
  • hlp
  • hex
  • sch
  • pcb
  • doc
mikroC PRO for AVR
  • lib
  • src
  • exa
  • hlp
  • hex
  • sch
  • pcb
  • doc
mikroC PRO for dsPIC30/33 & PIC24
  • lib
  • src
  • exa
  • hlp
  • hex
  • sch
  • pcb
  • doc
mikroC PRO for FT90x
  • lib
  • src
  • exa
  • hlp
  • hex
  • sch
  • pcb
  • doc
mikroC PRO for PIC
  • lib
  • src
  • exa
  • hlp
  • hex
  • sch
  • pcb
  • doc
mikroC PRO for PIC32
  • lib
  • src
  • exa
  • hlp
  • hex
  • sch
  • pcb
  • doc
mikroPascal PRO for ARM
  • lib
  • src
  • exa
  • hlp
  • hex
  • sch
  • pcb
  • doc
mikroPascal PRO for AVR
  • lib
  • src
  • exa
  • hlp
  • hex
  • sch
  • pcb
  • doc
mikroPascal PRO for dsPIC30/33 & PIC24
  • lib
  • src
  • exa
  • hlp
  • hex
  • sch
  • pcb
  • doc
mikroPascal PRO for FT90x
  • lib
  • src
  • exa
  • hlp
  • hex
  • sch
  • pcb
  • doc
mikroPascal PRO for PIC
  • lib
  • src
  • exa
  • hlp
  • hex
  • sch
  • pcb
  • doc
mikroPascal PRO for PIC32
  • lib
  • src
  • exa
  • hlp
  • hex
  • sch
  • pcb
  • doc

mikroSDK Library Blog

 UT-S 7-SEG R Click

UT-S 7-SEG R Click

Native view of the UT-S 7-SEG R Click board.

View full image
UT-S 7-SEG R Click

UT-S 7-SEG R Click

Front and bac view of the UT-S 7-SEG R Click.

View full image

Library Description 
The library covers all the necessary functions for UT-S 7SEG R click control.

Key functions 
uts7segr_writeData - Generic write function
uts7segr_writeNumDec - Writes decimal number
uts7segr_writeNumHex - Writes hexadecimal number

Examples Description
The demo application is composed of three sections:

  • System Initialization - Initialize GPIO pins and SPI module for communication with UT 7SEG click.
  • Application Initialization - Driver Initialization and turning on the lights by setting PWM pin to logical 1.
  • Application Task - Contains four sequences:
    • The first sequence shows how to use generic write functions by providing minus and custom. 
    • The second sequence is a demonstration of the counter using the function for decimal numbers.
    • The third sequence is a demonstration of the counter using the function for hexadecimal numbers.
    • The fourth sequence is a demonstration of the counter using a function with dot option.

NOTE: Brightness can be adjusted using the MCUs PWM module. In that case, GPIO setup for PWM pin is not necessary.

void applicationTask()
{
    uts7segr_writeData( _UTS7SEGR_MINUS, 0xFF );
    
    counter = 0;
    while (counter < 3)
    {
        uts7segr_lightCtl( 0 );
        Delay_ms( 200 );
        uts7segr_lightCtl( 1 );
        Delay_ms( 300 );
        counter++;
    }
    
    counter = 0;
    while (counter < 100)
    {
        uts7segr_writeNumDec( counter );
        Delay_ms(100);
        counter++;
    }
    
    counter = 0;
    while (counter < 0xFF)
    {
        uts7segr_writeNumHex( counter );
        Delay_ms(100);
        counter++;
    }
    
    counter = 0;
    while (counter < 100)
    {
        uts7segr_writeNumDot( counter, _UTS7SEGR_DOT_L );
        Delay_ms(100);
        counter++;
    }
}


Additional notes and information
Depending on the development board you are using, you may need USB UART click,  USB UART 2 click or  RS232 click to connect to your PC, for development systems with no UART to USB interface available on the board. The terminal available in all MikroElektronika compilers, or any other terminal application of your choice, can be used to read the message.    


ALSO FROM THIS AUTHOR

CAN SPI 5V click

0

This is code that shows simple connection of two CAN SPI modules with MCP2551.<br/> Messages are sent by pressing PortB buttons and received message can be seen on PortD LEDs.<br/>

[Learn More]

Charger 18 Click

0

Charger 18 Click is a compact add-on board representing a single-cell battery charger. This board features the LTC3553, a micropower, highly integrated power management, and battery charger for single-cell Li-Ion/Polymer battery applications from Analog Devices. Designed specifically for USB applications, it also includes a PowerPath manager with automatic load prioritization and input current limit, a battery charger, and numerous internal protection features. It also indicates a battery charge state, and it comes with a synchronous 200mA buck regulator and a 150mA low dropout linear regulator (LDO).

[Learn More]

Audio Xover Click

0

Audio Xover Click is an analog active crossover solution for two-way loudspeakers. The primary purpose of the crossover circuit in a loudspeaker is to split an incoming audio signal into frequency bands that are passed to the speaker or “driver” best suited.

[Learn More]