TOP Contributors

  1. MIKROE (2784 codes)
  2. Alcides Ramos (405 codes)
  3. Shawon Shahryiar (307 codes)
  4. jm_palomino (133 codes)
  5. Bugz Bensce (97 codes)
  6. S P (73 codes)
  7. dany (71 codes)
  8. MikroBUS.NET Team (35 codes)
  9. NART SCHINACKOW (34 codes)
  10. Armstrong Subero (27 codes)

Most Downloaded

  1. Timer Calculator (141305 times)
  2. FAT32 Library (74107 times)
  3. Network Ethernet Library (58718 times)
  4. USB Device Library (48831 times)
  5. Network WiFi Library (44526 times)
  6. FT800 Library (44078 times)
  7. GSM click (30834 times)
  8. mikroSDK (29673 times)
  9. PID Library (27357 times)
  10. microSD click (27252 times)
Libstock prefers package manager

Package Manager

We strongly encourage users to use Package manager for sharing their code on Libstock website, because it boosts your efficiency and leaves the end user with no room for error. [more info]

< Back
mikroSDK Library

tRF click

Rating:

5

Author: MIKROE

Last Updated: 2018-08-09

Package Version: 1.0.0.1

mikroSDK Library: 1.0.0.0

Category: Sub-1 GHz Transceivers

Downloaded: 8808 times

Followed by: 1 user

License: MIT license  

This example demonstrates usage of the tRF click board in mikroBUS form factor. Board features Telit's LE70-868 RF module.
The example will send the text string via the LE70-868 RF module display the received string on the Lcd.

No Abuse Reported

Do you want to subscribe in order to receive notifications regarding "tRF click" changes.

Do you want to unsubscribe in order to stop receiving notifications regarding "tRF click" changes.

Do you want to report abuse regarding "tRF click".
  • mikroSDK Library 2.0.0.0
  • Comments (1)
DOWNLOAD LINK RELATED COMPILER CONTAINS
mikroBasic PRO for ARM
  • lib
  • src
  • exa
  • hlp
  • hex
  • sch
  • pcb
  • doc
mikroBasic PRO for AVR
  • lib
  • src
  • exa
  • hlp
  • hex
  • sch
  • pcb
  • doc
mikroBasic PRO for dsPIC30/33 & PIC24
  • lib
  • src
  • exa
  • hlp
  • hex
  • sch
  • pcb
  • doc
mikroBasic PRO for FT90x
  • lib
  • src
  • exa
  • hlp
  • hex
  • sch
  • pcb
  • doc
mikroBasic PRO for PIC
  • lib
  • src
  • exa
  • hlp
  • hex
  • sch
  • pcb
  • doc
mikroBasic PRO for PIC32
  • lib
  • src
  • exa
  • hlp
  • hex
  • sch
  • pcb
  • doc
mikroC PRO for ARM
  • lib
  • src
  • exa
  • hlp
  • hex
  • sch
  • pcb
  • doc
mikroC PRO for AVR
  • lib
  • src
  • exa
  • hlp
  • hex
  • sch
  • pcb
  • doc
mikroC PRO for dsPIC30/33 & PIC24
  • lib
  • src
  • exa
  • hlp
  • hex
  • sch
  • pcb
  • doc
mikroC PRO for FT90x
  • lib
  • src
  • exa
  • hlp
  • hex
  • sch
  • pcb
  • doc
mikroC PRO for PIC
  • lib
  • src
  • exa
  • hlp
  • hex
  • sch
  • pcb
  • doc
mikroC PRO for PIC32
  • lib
  • src
  • exa
  • hlp
  • hex
  • sch
  • pcb
  • doc
mikroPascal PRO for ARM
  • lib
  • src
  • exa
  • hlp
  • hex
  • sch
  • pcb
  • doc
mikroPascal PRO for AVR
  • lib
  • src
  • exa
  • hlp
  • hex
  • sch
  • pcb
  • doc
mikroPascal PRO for dsPIC30/33 & PIC24
  • lib
  • src
  • exa
  • hlp
  • hex
  • sch
  • pcb
  • doc
mikroPascal PRO for FT90x
  • lib
  • src
  • exa
  • hlp
  • hex
  • sch
  • pcb
  • doc
mikroPascal PRO for PIC
  • lib
  • src
  • exa
  • hlp
  • hex
  • sch
  • pcb
  • doc
mikroPascal PRO for PIC32
  • lib
  • src
  • exa
  • hlp
  • hex
  • sch
  • pcb
  • doc

mikroSDK Library Blog

tRF click

tRF click

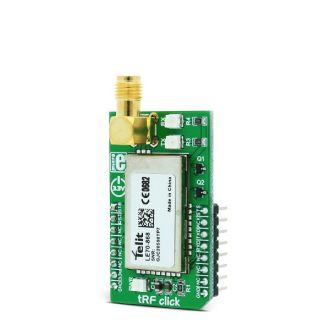
Native view of the tRF click board.

View full image
tRF Click Board

tRF Click Board

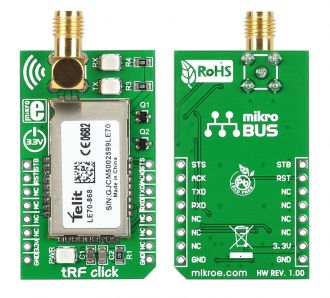
Front and back side appearance of the tRF Click Board.

View full image

Library Description

Initializes and defines UART bus driver, and defines driver's functions for comunication (reading and writing) between tRF clicks.

Key functions:

  • void trf_writeByte(uint8_t input) - Function writes (sends) one byte in UART rx buffer
  • uint8_t trf_readByte() - Function reads (receives) one byte from UART rx buffer
  • uint8_t trf_byteReady() - Function checks state of rx buffer (is new data placed in)
  • void trf_reset() - Function resets click and sets back in normal operating mode

Example description

The application is composed of three sections:

  • System Initialization - Intializes UART module
  • Application Initialization - Driver intialization
  • Application Task - (code snippet) - Checks if new data byte have received in rx buffer (ready for reading), and if ready than reads one byte from rx buffer. In second case aplication task writes message data via UART.
void applicationTask()
{
 char tmp;
 uint8_t rdyFlag;

// RECEIVER - UART polling 

 rdyFlag = trf_byteReady();

 if (1 == rdyFlag)
 {
 tmp = trf_readByte();
 mikrobus_logWrite( &tmp, _LOG_BYTE );
 }

// TRANSMITER - TX each 2 sec

 /*for (tmp = 0; tmp < 9; tmp++)
 {
 trf_writeByte( MESSAGE_DATA[tmp] );
 mikrobus_logWrite( "MESSAGE SENT", _LOG_LINE );
 Delay_100ms();
 }
 Delay_ms(2000);*/
}


Other mikroE Libraries used in the example:

  • Conversions
  • UART

Additional notes and information

Depending on the development board you are using, you may need USB UART clickUSB UART 2 click or RS232 click to connect to your PC, for development systems with no UART to USB interface available on the board. The terminal available in all MikroElektronika compilers, or any other terminal application of your choice, can be used to read the message.

ALSO FROM THIS AUTHOR

DC Motor 29 Click

0

DC Motor 29 Click is a compact add-on board that contains a high-performance DC motor driver. This board features the DRV8245P, an automotive H-Bridge driver with integrated current sense and diagnostic from Texas Instruments. It can be configured as a single full-bridge driver or independent half-bridge driver. The driver offers excellent power handling and thermal capability due to a BiCMOS high power process technology mode, in which it is designed.

[Learn More]

LED Driver 3 Click

5

LED Driver 3 click is an RGB LED driver, capable of driving RGB LEDs with up to 30mA per segment, via the digital I2C interface. It comes with an RGB LED onboard, and is capable of displaying a palette of 32768 colors.

[Learn More]

OSD click

0

This is a sample program which demonstrates the use of OSD click. Program shows the time and date in corners of the screen and enable you to set the time and date, using the OSD menu.

[Learn More]