
We strongly encourage users to use Package manager for sharing their code on Libstock website, because it boosts your efficiency and leaves the end user with no room for error. [more info]

Rating:
Author: MIKROE
Last Updated: 2018-02-13
Package Version: 1.0.0.0
Category: Other Codes
Downloaded: 4361 times
Followed by: 10 users
License: MIT license
Contains common utilities that are often implemented repetitively.
This library contains a task scheduler. Incredibly handy for those systems doing multiple things.
By using the libraries here, you save yourself some time and have the convenience of MikroCs' library management system.
Do you want to subscribe in order to receive notifications regarding "Utility Task Scheduler" changes.
Do you want to unsubscribe in order to stop receiving notifications regarding "Utility Task Scheduler" changes.
Do you want to report abuse regarding "Utility Task Scheduler".
| DOWNLOAD LINK | RELATED COMPILER | CONTAINS |
|---|---|---|
| 1441367555_utility_task_sch_mikroc_8051.mpkg [184.92KB] | mikroC PRO for 8051 |
|
| 1441367568_utility_task_sch_mikroc_arm.mpkg [189.20KB] | mikroC PRO for ARM |
|
| 1441367581_utility_task_sch_mikroc_avr.mpkg [185.14KB] | mikroC PRO for AVR |
|
| 1441367596_utility_task_sch_mikroc_dspic.mpkg [189.02KB] | mikroC PRO for dsPIC30/33 & PIC24 |
|
| 1441367611_utility_task_sch_mikroc_ft90x.mpkg [178.73KB] | mikroC PRO for FT90x |
|
| 1518536663_utility_task_sch_mikroc_pic.zip [143.32KB] | mikroC PRO for PIC |
|
| 1441367652_utility_task_sch_mikroc_pic32.mpkg [180.45KB] | mikroC PRO for PIC32 |
|
This is one of the more handy tools to have in your library of tricks. As applications grow larger and don't quite yet need a RTOS, scheduling tasks can make the system more efficient. One of the best practices is to utilize the MCU sleep modes while scheduled pooled tasks are placed in the scheduler. Requirements:
The idea of a scheduler is found in the name, scheduler. In most systems, we do more than one thing and we also want to take advantage of lower power states. This scheduler is a simple one, but will prove to be one of your favorites.
Usage Scenario:
How to: Task scheduled tasks needs to be functions that take no arguments and returns nothings. Example: void read_rtc( void )
{
int hour;
...
I2C_Read( DS1307_ADDR );
...
update_global_hour( hour );
return;
} void update_network( void )
{
Net_Ethernet_24j600_userTimerSec++;
} void write_data_to_flash( void )
{
write_to_flash( global_sensor_data );
} Now that we have an idea of how a task is defined in a function, how do we setup the scheduler? First thing we need is a reliable timer that generates an interrupt. It also needs a interrupt time that is a multiple of 100. 100, 200, .... 500, 2000, etc. This is when we want to use the amazing Timer Calculator tool: //Timer2 Prescaler :575; Preload = 62499; Actual Interrupt Time = 500 ms
void InitTimer2()
{
RCC_APB1ENR.TIM2EN = 1;
TIM2_CR1.CEN = 0;
TIM2_PSC = 575;
TIM2_ARR = 62499;
NVIC_IntEnable(IVT_INT_TIM2);
TIM2_DIER.UIE = 1;
TIM2_CR1.CEN = 1;
} For our interrupt we need to call the function task_scheduler_clock(); void Timer2_interrupt() iv IVT_INT_TIM2
{
TIM2_SR.UIF = 0;
task_scheduler_clock();
} That has setup our scheduler to be able to keep track of time. Now let's get to the business of using it. The scheduler needs to know how often the interrupt will be called. We do that with: task_scheduler_init( NUMBER OF MS INT IS CALLED ); Using the above timer it would be: task_scheduler_init( 500 ); Next we need to add some tasks: task_add( read_rtc, SCH_MINUTES_1 ); task_add( update_network, SCH_SECONDS_1 ); task_add( write_data_to_flash, SCH_MINUTES_5 ); The first argument is the function to call and the second is when in ms. The library has built in defines for time, but you can also declare the time in ms just the same. ex. task_add( update_network, 1000 ); Another scenario would be a task that you add and remove from time to time. To do that you can capture the id of the task: int once_in_awhile_taskid; once_in_awhile_taskid = task_add( send_sms, SCH_MINUTES_10 ); Then if you don't need it anymore or just want to pause the task, you can use the following: task_delete( once_in_awhile_taskid ); or task_stop( once_in_awhile_taskid ); Later you can re-enable the task: task_resume( once_in_awhile_taskid ); We've added some tasks, time to get started. You will need to call task_scheduler_start() before the while loop. task_scheduler_init( 500 );
....
task_scheduler_start();
while( 1 )
{
....
} Lastly, we need the scheduler to execute the tasks. To do this we add the following inside the while loop. while( 1 )
{
task_dispatch();
} This is one of my favorite libraries to use. For the ~1k of flash storage, it greatly simplifies the execution of repetitive tasks and allows the usage of low power states. while( 1 )
{
task_dispatch();
sleep();
} Enjoy.
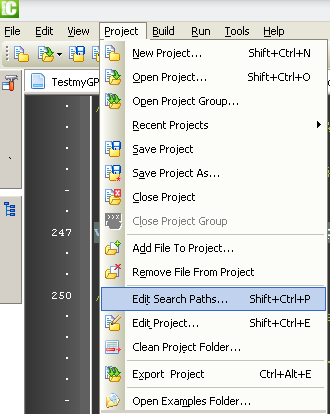
*NOTE: You will need to add "scheduler.h" to your project search path. All libraries are installed into \YOUR_MIKROC_INSTALLATION\Packages\PACKAGE_NAME\Uses\ Example:
C:\Program Files (x86)\Mikroelektronika\mikroC PRO for ARM\Packages\Utilities Scheduler\Uses\


