TOP Contributors

  1. MIKROE (2784 codes)
  2. Alcides Ramos (405 codes)
  3. Shawon Shahryiar (307 codes)
  4. jm_palomino (133 codes)
  5. Bugz Bensce (97 codes)
  6. S P (73 codes)
  7. dany (71 codes)
  8. MikroBUS.NET Team (35 codes)
  9. NART SCHINACKOW (34 codes)
  10. Armstrong Subero (27 codes)

Most Downloaded

  1. Timer Calculator (141205 times)
  2. FAT32 Library (73995 times)
  3. Network Ethernet Library (58641 times)
  4. USB Device Library (48761 times)
  5. Network WiFi Library (44457 times)
  6. FT800 Library (44030 times)
  7. GSM click (30784 times)
  8. mikroSDK (29513 times)
  9. PID Library (27334 times)
  10. microSD click (27188 times)
Libstock prefers package manager

Package Manager

We strongly encourage users to use Package manager for sharing their code on Libstock website, because it boosts your efficiency and leaves the end user with no room for error. [more info]

< Back
mikroSDK Library

AudioAmp 2 click

Rating:

5

Author: MIKROE

Last Updated: 2018-07-03

Package Version: 1.0.0.0

mikroSDK Library: 1.0.0.0

Category: Amplifier

Downloaded: 4899 times

Not followed.

License: MIT license  

Audio Amp 2 click is a highly efficient class D audio amplifier, using the TDA7491, a dual BTL class-D audio amplifier IC, capable of delivering up to 20W to 8Ω load.

No Abuse Reported

Do you want to subscribe in order to receive notifications regarding "AudioAmp 2 click" changes.

Do you want to unsubscribe in order to stop receiving notifications regarding "AudioAmp 2 click" changes.

Do you want to report abuse regarding "AudioAmp 2 click".
  • mikroSDK Library 2.0.0.0
  • Comments (0)
DOWNLOAD LINK RELATED COMPILER CONTAINS
mikroBasic PRO for ARM
  • lib
  • src
  • exa
  • hlp
  • hex
  • sch
  • pcb
  • doc
mikroBasic PRO for AVR
  • lib
  • src
  • exa
  • hlp
  • hex
  • sch
  • pcb
  • doc
mikroBasic PRO for dsPIC30/33 & PIC24
  • lib
  • src
  • exa
  • hlp
  • hex
  • sch
  • pcb
  • doc
mikroBasic PRO for FT90x
  • lib
  • src
  • exa
  • hlp
  • hex
  • sch
  • pcb
  • doc
mikroBasic PRO for PIC
  • lib
  • src
  • exa
  • hlp
  • hex
  • sch
  • pcb
  • doc
mikroBasic PRO for PIC32
  • lib
  • src
  • exa
  • hlp
  • hex
  • sch
  • pcb
  • doc
mikroC PRO for ARM
  • lib
  • src
  • exa
  • hlp
  • hex
  • sch
  • pcb
  • doc
mikroC PRO for AVR
  • lib
  • src
  • exa
  • hlp
  • hex
  • sch
  • pcb
  • doc
mikroC PRO for dsPIC30/33 & PIC24
  • lib
  • src
  • exa
  • hlp
  • hex
  • sch
  • pcb
  • doc
mikroC PRO for FT90x
  • lib
  • src
  • exa
  • hlp
  • hex
  • sch
  • pcb
  • doc
mikroC PRO for PIC
  • lib
  • src
  • exa
  • hlp
  • hex
  • sch
  • pcb
  • doc
mikroC PRO for PIC32
  • lib
  • src
  • exa
  • hlp
  • hex
  • sch
  • pcb
  • doc
mikroPascal PRO for ARM
  • lib
  • src
  • exa
  • hlp
  • hex
  • sch
  • pcb
  • doc
mikroPascal PRO for AVR
  • lib
  • src
  • exa
  • hlp
  • hex
  • sch
  • pcb
  • doc
mikroPascal PRO for dsPIC30/33 & PIC24
  • lib
  • src
  • exa
  • hlp
  • hex
  • sch
  • pcb
  • doc
mikroPascal PRO for FT90x
  • lib
  • src
  • exa
  • hlp
  • hex
  • sch
  • pcb
  • doc
mikroPascal PRO for PIC
  • lib
  • src
  • exa
  • hlp
  • hex
  • sch
  • pcb
  • doc
mikroPascal PRO for PIC32
  • lib
  • src
  • exa
  • hlp
  • hex
  • sch
  • pcb
  • doc

mikroSDK Library Blog

AudioAmp 2 click

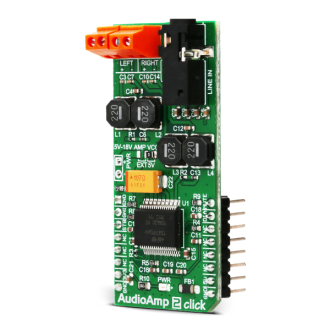
AudioAmp 2 click

Native view of the AudioAmp 2 click board.

View full image
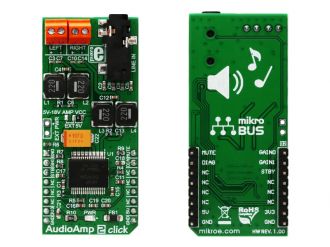
AudioAmp 2 click

AudioAmp 2 click

Front and back view of the AudioAmp 2 click board.

View full image

Library Description

Library offers a choice to put the device in desired mode (Standby, Mute or Play Mode) and to select the gain to the desired value (20, 26, 30 or 32dB).
For more details check the documentation.

Key functions :

  • uint8_t audioamp2_setMode( uint8_t selMode ) - Function puts device in desired mode.
  • uint8_t audioamp2_setGain( uint8_t selGain ) - Function performs the gain selection.
  • uint8_t audioamp2_checkDiagnostic( void )- Function checks isundervoltage, overcurrent or thermal protection activated.

Example description

The application is composed of three sections :


System Initialization - Initializes peripherals and pins.
Application Initialization - Initializes GPIO driver and puts the device in Standby Mode as default
operation mode and selects 20dB as default gain selection.
Application Task - (code snippet) - Activates Mute operation mode for 4 seconds and after that activates Play mode.
When the device is in Play mode then changes the gain selection, first sets the minimum gain (20dB) for 8 seconds and then sets the maximum gain (32dB) for 8 seconds too.
Note: Internally, the gain is set by changing the feedback resistors of the amplifier.

void applicationTask()
{
audioamp2_setMode( _AUDIOAMP2_MUTE_MODE );
Delay_ms( 4000 );
audioamp2_setGain( _AUDIOAMP2_20DB_GAIN );
audioamp2_setMode( _AUDIOAMP2_PLAY_MODE );
Delay_ms( 8000 );
audioamp2_setGain( _AUDIOAMP2_32DB_GAIN );
Delay_ms( 8000 );
}


Other mikroE Libraries used in the example:

  • UART

Additional notes and information

Depending on the development board you are using, you may need USB UART clickUSB UART 2 click or RS232 click to connect to your PC, for development systems with no UART to USB interface available on the board. The terminal available in all MikroElektronika compilers, or any other terminal application of your choice, can be used to read the message.

ALSO FROM THIS AUTHOR

Barometer 3 click

5

Barometer 3 Click is a compact add-on board for applications which require digital barometric air pressure measurement. This board features the DPS368, a digital barometric air pressure sensor from Infineon. It offers a high accuracy and a low current consumption, capable of measuring both pressure and temperature.

[Learn More]

PAC1954 click

5

PAC1954 Click is a compact add-on board that contains an energy monitoring solution. This board features the PAC1954, a four-channel DC power/energy monitor from Microchip Technology.

[Learn More]

Button Y Click

0

Button Y Click is a Click board™ equipped with the tactile switch, sometimes referred to as a pushbutton. A pushbutton is a component that is used very often in various designs, allowing the user to interact with the application. Although it sounds simple, a button needs to comply with a range of application requirements. It needs to have a very good mechanical endurance while retaining its specifications, a predictable bouncing time, a very low ON resistance, very high OFF resistance, and it needs to fulfill aesthetical requirements.

[Learn More]