TOP Contributors

  1. MIKROE (2784 codes)
  2. Alcides Ramos (405 codes)
  3. Shawon Shahryiar (307 codes)
  4. jm_palomino (133 codes)
  5. Bugz Bensce (97 codes)
  6. S P (73 codes)
  7. dany (71 codes)
  8. MikroBUS.NET Team (35 codes)
  9. NART SCHINACKOW (34 codes)
  10. Armstrong Subero (27 codes)

Most Downloaded

  1. Timer Calculator (142087 times)
  2. FAT32 Library (75339 times)
  3. Network Ethernet Library (59508 times)
  4. USB Device Library (49528 times)
  5. Network WiFi Library (45310 times)
  6. FT800 Library (44942 times)
  7. GSM click (31452 times)
  8. mikroSDK (30476 times)
  9. microSD click (27805 times)
  10. PID Library (27625 times)
Libstock prefers package manager

Package Manager

We strongly encourage users to use Package manager for sharing their code on Libstock website, because it boosts your efficiency and leaves the end user with no room for error. [more info]

< Back
mikroSDK Library

Silent Step 3 click

Rating:

5

Author: MIKROE

Last Updated: 2019-07-29

Package Version: 1.0.0.0

mikroSDK Library: 1.0.0.0

Category: Stepper

Downloaded: 3486 times

Not followed.

License: MIT license  

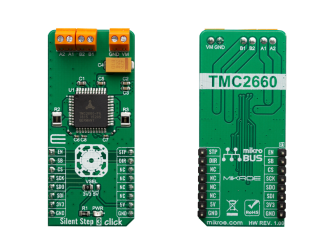
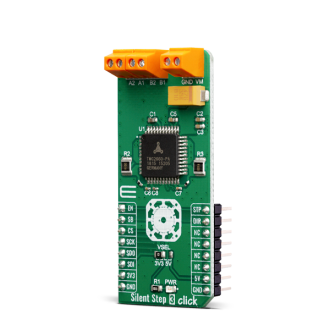
Silent Step 3 Click is the complete integrated bipolar step motor driver solution, rich with many features that allow extremely smooth and silent operation of the connected motor while being able to provide up to 4A peak motor current and withstand up to 30V supply voltage.

No Abuse Reported

Do you want to subscribe in order to receive notifications regarding "Silent Step 3 click" changes.

Do you want to unsubscribe in order to stop receiving notifications regarding "Silent Step 3 click" changes.

Do you want to report abuse regarding "Silent Step 3 click".
  • mikroSDK Library 2.0.0.0
  • Comments (0)
DOWNLOAD LINK RELATED COMPILER CONTAINS
mikroBasic PRO for ARM
  • lib
  • src
  • exa
  • hlp
  • hex
  • sch
  • pcb
  • doc
mikroBasic PRO for AVR
  • lib
  • src
  • exa
  • hlp
  • hex
  • sch
  • pcb
  • doc
mikroBasic PRO for dsPIC30/33 & PIC24
  • lib
  • src
  • exa
  • hlp
  • hex
  • sch
  • pcb
  • doc
mikroBasic PRO for FT90x
  • lib
  • src
  • exa
  • hlp
  • hex
  • sch
  • pcb
  • doc
mikroBasic PRO for PIC
  • lib
  • src
  • exa
  • hlp
  • hex
  • sch
  • pcb
  • doc
mikroBasic PRO for PIC32
  • lib
  • src
  • exa
  • hlp
  • hex
  • sch
  • pcb
  • doc
mikroC PRO for ARM
  • lib
  • src
  • exa
  • hlp
  • hex
  • sch
  • pcb
  • doc
mikroC PRO for AVR
  • lib
  • src
  • exa
  • hlp
  • hex
  • sch
  • pcb
  • doc
mikroC PRO for dsPIC30/33 & PIC24
  • lib
  • src
  • exa
  • hlp
  • hex
  • sch
  • pcb
  • doc
mikroC PRO for FT90x
  • lib
  • src
  • exa
  • hlp
  • hex
  • sch
  • pcb
  • doc
mikroC PRO for PIC
  • lib
  • src
  • exa
  • hlp
  • hex
  • sch
  • pcb
  • doc
mikroC PRO for PIC32
  • lib
  • src
  • exa
  • hlp
  • hex
  • sch
  • pcb
  • doc
mikroPascal PRO for ARM
  • lib
  • src
  • exa
  • hlp
  • hex
  • sch
  • pcb
  • doc
mikroPascal PRO for AVR
  • lib
  • src
  • exa
  • hlp
  • hex
  • sch
  • pcb
  • doc
mikroPascal PRO for dsPIC30/33 & PIC24
  • lib
  • src
  • exa
  • hlp
  • hex
  • sch
  • pcb
  • doc
mikroPascal PRO for FT90x
  • lib
  • src
  • exa
  • hlp
  • hex
  • sch
  • pcb
  • doc
mikroPascal PRO for PIC
  • lib
  • src
  • exa
  • hlp
  • hex
  • sch
  • pcb
  • doc
mikroPascal PRO for PIC32
  • lib
  • src
  • exa
  • hlp
  • hex
  • sch
  • pcb
  • doc

mikroSDK Library Blog

Silent Step 3 click

Silent Step 3 click

Native view of the Silent Step 3 click board.

View full image
Silent Step 3 click

Silent Step 3 click

Front and back view of the Silent Step 3 click board.

View full image

Library Description

Library carries everything needed for stepper motor control including speed and acceleration setup. Library is also adjustable to working on different amount of ticks per second, also speed and acceleration can be provided in float format. Buffer used for movement calculation is defined by user so this library can be adjusted for MCUs with very limited RAM resources. Check documentation for more details how to use it.

Key functions:

  • uint8_t silentstep3_setSpeed( float minSpeed, float maxSpeed, float accelRatio, T_SILENTSTEP3_OBJ obj ) - Setup motor speed.
  • uint8_t silentstep3_setRoute( const uint8_t _direction, uint32_t steps, T_SILENTSTEP3_OBJ obj ) - Setup new route.
  • void silentstep3_start( T_SILENTSTEP3_OBJ obj ) - Start motor movement.

Examples description

The application is composed of three sections :

  • System Initialization - Initializes all GPIO pins found on Silent Step 3 click, SPI serial interface and timer to 1ms interrupt.
  • Application Initialization - First segment initializes driver and stepper control. Second segment setup movement limits, maximum and minimum speed, and acceleration ratio. Third segment enables motor and setup new route which will be called from application task. Fourth segment executes device control and configuration by using SPI serial interface.
  • Application Task - (code snippet) - Demonstrates the full stepper motor control, such as stepper motor speed, acceleration, direction, microstep resolution, steps number, and etc.
void applicationTask()
{
    running_cnt = 3;
    
    while (running_cnt > 0)
    {
        silentstep3_writeCmd( _SILENTSTEP3_HALFSTEP );
        silentstep3_setSpeed( 20.0, 1000.0, 0.1, (T_SILENTSTEP3_OBJ)&myStepper );
        silentstep3_setRoute( _SILENTSTEP3_DIR_CCW, 200, (T_SILENTSTEP3_OBJ)&myStepper );
        silentstep3_start( (T_SILENTSTEP3_OBJ)&myStepper );
        
        while (myStepper.status.running)
        {
            silentstep3_process( (T_SILENTSTEP3_OBJ)&myStepper );
        }
        
        silentstep3_writeCmd( _SILENTSTEP3_FULLSTEP );
        silentstep3_setSpeed( 1000.0, 1000.0, 0.1, (T_SILENTSTEP3_OBJ)&myStepper );
        silentstep3_setRoute( _SILENTSTEP3_DIR_CW, 200, (T_SILENTSTEP3_OBJ)&myStepper );
        silentstep3_start( (T_SILENTSTEP3_OBJ)&myStepper );
        
        while (myStepper.status.running)
        {
            silentstep3_process( (T_SILENTSTEP3_OBJ)&myStepper );
        }
        
        running_cnt--;
    }
    
    silentstep3_setSpeed( 10.0, 200.0, 0.1, (T_SILENTSTEP3_OBJ)&myStepper );
    silentstep3_setRoute( _SILENTSTEP3_DIR_CCW, 200, (T_SILENTSTEP3_OBJ)&myStepper );
    silentstep3_start( (T_SILENTSTEP3_OBJ)&myStepper );
    
    while (myStepper.status.running)
    {
        silentstep3_process( (T_SILENTSTEP3_OBJ)&myStepper );
    }

    silentstep3_setSpeed( 1000.0, 1000.0, 0.1, (T_SILENTSTEP3_OBJ)&myStepper );
    silentstep3_setRoute( _SILENTSTEP3_DIR_CW, 200, (T_SILENTSTEP3_OBJ)&myStepper );
    running_cnt = 6;

    while (running_cnt > 0)
    {
        silentstep3_start( (T_SILENTSTEP3_OBJ)&myStepper );
                
        while (myStepper.status.running)
        {
            silentstep3_process( (T_SILENTSTEP3_OBJ)&myStepper );
        }
                
        running_cnt--;
    }
    
    running_cnt = 12;
    
    while (running_cnt > 0)
    {
        silentstep3_writeCmd( _SILENTSTEP3_8_MICROSTEPS );
        silentstep3_setRoute( _SILENTSTEP3_DIR_CCW, 200, (T_SILENTSTEP3_OBJ)&myStepper );
        silentstep3_start( (T_SILENTSTEP3_OBJ)&myStepper );
        
        while (myStepper.status.running)
        {
            silentstep3_process( (T_SILENTSTEP3_OBJ)&myStepper );
        }
        
        silentstep3_writeCmd( _SILENTSTEP3_4_MICROSTEPS );
        silentstep3_setRoute( _SILENTSTEP3_DIR_CW, 200, (T_SILENTSTEP3_OBJ)&myStepper );
        silentstep3_start( (T_SILENTSTEP3_OBJ)&myStepper );
        
        while (myStepper.status.running)
        {
            silentstep3_process( (T_SILENTSTEP3_OBJ)&myStepper );
        }
        
        running_cnt--;
    }
    
    Delay_ms( 1000 );
}


In addition to library function calls example carries necessay Timer ISR and Timer initialization. Check Timer initialization setings and update it according to your MCU - Timer Calculator.

Additional notes and informations

Depending on the development board you are using, you may need USB UART clickUSB UART 2 click or RS232 click to connect to your PC, for development systems with no UART to USB interface available on the board. The terminal available in all MikroElektronika compilers, or any other terminal application of your choice, can be used to read the message.

ALSO FROM THIS AUTHOR

IR Grid 4 Click

0

IR Grid 4 Click is a compact add-on board for high-precision, non-contact temperature measurement and thermal imaging. This board is based on the MLX90641, a fully calibrated thermal IR array from Melexis. It captures temperature data across a 16x12 matrix (192 pixels) and accurately measures temperatures from -40°C to +300°C with a typical accuracy of 1°C. The board supports the innovative 'Click Snap' feature, allowing the sensor area to be detached for flexible positioning.

[Learn More]

Button R Click

0

Button R Click is the simplest solution for adding a single pushbutton to your design. The button itself is transparent, 6.8mm in diameter and has a red LED backlight. When pressed, it sends an interrupt signal to the target board microcontroller. The backlight LED is controlled separately through the mikroBUS PWM pin, so you can program all kinds of patterns (varying level of light intensity or rate of blinking on subsequent button presses). The board can use either a 3.3V or a 5V power supply.

[Learn More]

LED Driver 14 Click

0

LED Driver 14 Click is a compact add-on board that simplifies the control of multiple LEDs. This board features the BD18337EFV-M, a reliable four-channel constant current LED driver from Rohm Semiconductor. It is powered by an external power supply in the range of 5.5V to 20V, providing a maximum output current of 150mA per channel. The BD18337EFV-M also comes with the possibility for up to 3 LEDs in series on its output OUTx pin and built-in energy sharing control, selectable operational mode, and multiple built-in protection functions that protect the circuit during abnormalities. This Click board™ is ideal for LED rear lamps (turn/stop), fog lamps, and turn signals for automotive applications.

[Learn More]