TOP Contributors

  1. MIKROE (2784 codes)
  2. Alcides Ramos (402 codes)
  3. Shawon Shahryiar (307 codes)
  4. jm_palomino (129 codes)
  5. Bugz Bensce (97 codes)
  6. S P (73 codes)
  7. dany (71 codes)
  8. MikroBUS.NET Team (35 codes)
  9. NART SCHINACKOW (34 codes)
  10. Armstrong Subero (27 codes)

Most Downloaded

  1. Timer Calculator (140824 times)
  2. FAT32 Library (73437 times)
  3. Network Ethernet Library (58248 times)
  4. USB Device Library (48422 times)
  5. Network WiFi Library (44043 times)
  6. FT800 Library (43624 times)
  7. GSM click (30500 times)
  8. mikroSDK (29206 times)
  9. PID Library (27192 times)
  10. microSD click (26877 times)
Libstock prefers package manager

Package Manager

We strongly encourage users to use Package manager for sharing their code on Libstock website, because it boosts your efficiency and leaves the end user with no room for error. [more info]

< Back
mikroSDK Library

PS/2 click

Rating:

5

Author: MIKROE

Last Updated: 2019-05-28

Package Version: 1.0.0.1

mikroSDK Library: 1.0.0.0

Category: Adapter

Downloaded: 6410 times

Followed by: 1 user

License: MIT license  

Simple demonstration of using PS/2 communication protocol. Example detects keyboard press and writes the corresponding key on UART.

No Abuse Reported

Do you want to subscribe in order to receive notifications regarding "PS/2 click" changes.

Do you want to unsubscribe in order to stop receiving notifications regarding "PS/2 click" changes.

Do you want to report abuse regarding "PS/2 click".
  • Information
  • Comments (0)
DOWNLOAD LINK RELATED COMPILER CONTAINS
mikroBasic PRO for ARM
  • lib
  • src
  • exa
  • hlp
  • hex
  • sch
  • pcb
  • doc
mikroBasic PRO for AVR
  • lib
  • src
  • exa
  • hlp
  • hex
  • sch
  • pcb
  • doc
mikroBasic PRO for dsPIC30/33 & PIC24
  • lib
  • src
  • exa
  • hlp
  • hex
  • sch
  • pcb
  • doc
mikroBasic PRO for FT90x
  • lib
  • src
  • exa
  • hlp
  • hex
  • sch
  • pcb
  • doc
mikroBasic PRO for PIC
  • lib
  • src
  • exa
  • hlp
  • hex
  • sch
  • pcb
  • doc
mikroBasic PRO for PIC32
  • lib
  • src
  • exa
  • hlp
  • hex
  • sch
  • pcb
  • doc
mikroC PRO for ARM
  • lib
  • src
  • exa
  • hlp
  • hex
  • sch
  • pcb
  • doc
mikroC PRO for AVR
  • lib
  • src
  • exa
  • hlp
  • hex
  • sch
  • pcb
  • doc
mikroC PRO for dsPIC30/33 & PIC24
  • lib
  • src
  • exa
  • hlp
  • hex
  • sch
  • pcb
  • doc
mikroC PRO for FT90x
  • lib
  • src
  • exa
  • hlp
  • hex
  • sch
  • pcb
  • doc
mikroC PRO for PIC
  • lib
  • src
  • exa
  • hlp
  • hex
  • sch
  • pcb
  • doc
mikroC PRO for PIC32
  • lib
  • src
  • exa
  • hlp
  • hex
  • sch
  • pcb
  • doc
mikroPascal PRO for ARM
  • lib
  • src
  • exa
  • hlp
  • hex
  • sch
  • pcb
  • doc
mikroPascal PRO for AVR
  • lib
  • src
  • exa
  • hlp
  • hex
  • sch
  • pcb
  • doc
mikroPascal PRO for dsPIC30/33 & PIC24
  • lib
  • src
  • exa
  • hlp
  • hex
  • sch
  • pcb
  • doc
mikroPascal PRO for FT90x
  • lib
  • src
  • exa
  • hlp
  • hex
  • sch
  • pcb
  • doc
mikroPascal PRO for PIC
  • lib
  • src
  • exa
  • hlp
  • hex
  • sch
  • pcb
  • doc
mikroPascal PRO for PIC32
  • lib
  • src
  • exa
  • hlp
  • hex
  • sch
  • pcb
  • doc

mikroSDK Library Blog

PS/2 click board

PS/2 click board

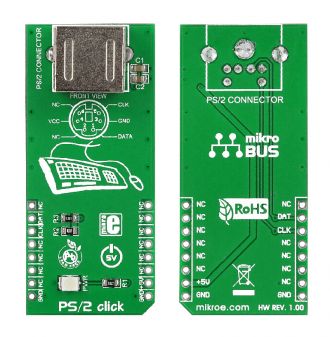
Front and back side appearance of the PS/2 click board.

View full image

Library Description

The library covers all the necessary functions to control PS/2 click board.

Key functions:

  • void ps2_gpioDriverInit(T_PS2_P gpioObj) - Function initializes GPIO driver for the desired MIKROBUS1.

Examples description

The application is composed of the three sections :

  • System Initialization - Initializes GPIO and start to write log.
  • Application Initialization - Initialization driver enables - GPIO, also display logs.
  • Application Task - This is an example which demonstrates the use of PS/2 Click board. In this example, key(s) pressed on the PS/2 keyboard are read and transferred to the PC through serial port connection. Various basic keyboard activities are tested: "normal" keys, keys with <Shift> pressed, keys with <Caps Lock> pressed, numerical keypad ON/OFF and keys. Results are being sent to the Usart Terminal where you can track their changes.
void applicationTask()
{
    char logText;

    if ( Ps2_Key_Read( &logText, &specialFlag, &pressedState ) )
    {
        if ( pressedState )
        {
            if ( logText == _PS2_BACKSPACE )
            {
                mikrobus_logWrite( " <- Backspace", _LOG_LINE );
            }

            if ( logText == _PS2_ENTER )
            {
                mikrobus_logWrite( "", _LOG_LINE );
            }

            if ( !specialFlag && logText )
            {
                mikrobus_logWrite( &logText, _LOG_BYTE );
            }
        }
    }

    Delay_1ms();
}

Other mikroE Libraries used in the example:

  • PS2
  • UART

Additional notes and informations

Depending on the development board you are using, you may need USB UART clickUSB UART 2 click or RS232 click to connect to your PC, for development systems with no UART to USB interface available on the board. The terminal available in all MikroElektronika compilers, or any other terminal application of your choice, can be used to read the message.

ALSO FROM THIS AUTHOR

EEPROM 13 Click

0

EEPROM 13 Click is a compact add-on board that contains a highly reliable, nonvolatile memory solution. This board features the M24M01E, an electrically erasable programmable memory with enhanced hardware write protection for entire memory from STMicroelectronics. Its memory size of 1Mbit is organized as 128K words of 8bits each, with a page size of 256 bytes and an additional 256 bytes of identification page. The identification page can be used to store sensitive application parameters, which can be (later) permanently locked in read-only mode.

[Learn More]

DigiVref Click

0

DigiVref Click is a very precise voltage reference Click board™, which allows one of four different voltage values to be selected over the SPI interface.

[Learn More]

Thermo 16 click

5

Thermo 16 Click is a Click board™ equipped with the sensor IC, which can measure temperature measurements between -40°C and +150°C so that the temperature measurement data can be processed by the host MCU.

[Learn More]