TOP Contributors

  1. MIKROE (2784 codes)
  2. Alcides Ramos (405 codes)
  3. Shawon Shahryiar (307 codes)
  4. jm_palomino (133 codes)
  5. Bugz Bensce (97 codes)
  6. S P (73 codes)
  7. dany (71 codes)
  8. MikroBUS.NET Team (35 codes)
  9. NART SCHINACKOW (34 codes)
  10. Armstrong Subero (27 codes)

Most Downloaded

  1. Timer Calculator (141697 times)
  2. FAT32 Library (74777 times)
  3. Network Ethernet Library (59218 times)
  4. USB Device Library (49226 times)
  5. Network WiFi Library (44999 times)
  6. FT800 Library (44536 times)
  7. GSM click (31200 times)
  8. mikroSDK (30103 times)
  9. microSD click (27586 times)
  10. PID Library (27540 times)
Libstock prefers package manager

Package Manager

We strongly encourage users to use Package manager for sharing their code on Libstock website, because it boosts your efficiency and leaves the end user with no room for error. [more info]

< Back
mikroSDK Library

I2C 1-Wire click

Rating:

5

Author: MIKROE

Last Updated: 2019-05-29

Package Version: 1.0.0.1

mikroSDK Library: 1.0.0.0

Category: 1-Wire

Downloaded: 6697 times

Followed by: 2 users

License: MIT license  

This example shows ID numbers from Unique ID Click and several Thermo Sensors (DS1820), connected on each channel. If there is no device detected on the channel, warning note is shown on TFT.

No Abuse Reported

Do you want to subscribe in order to receive notifications regarding "I2C 1-Wire click" changes.

Do you want to unsubscribe in order to stop receiving notifications regarding "I2C 1-Wire click" changes.

Do you want to report abuse regarding "I2C 1-Wire click".
  • mikroSDK Library 2.0.0.0
  • Comments (0)
DOWNLOAD LINK RELATED COMPILER CONTAINS
mikroBasic PRO for ARM
  • lib
  • src
  • exa
  • hlp
  • hex
  • sch
  • pcb
  • doc
mikroBasic PRO for AVR
  • lib
  • src
  • exa
  • hlp
  • hex
  • sch
  • pcb
  • doc
mikroBasic PRO for dsPIC30/33 & PIC24
  • lib
  • src
  • exa
  • hlp
  • hex
  • sch
  • pcb
  • doc
mikroBasic PRO for FT90x
  • lib
  • src
  • exa
  • hlp
  • hex
  • sch
  • pcb
  • doc
mikroBasic PRO for PIC
  • lib
  • src
  • exa
  • hlp
  • hex
  • sch
  • pcb
  • doc
mikroBasic PRO for PIC32
  • lib
  • src
  • exa
  • hlp
  • hex
  • sch
  • pcb
  • doc
mikroC PRO for ARM
  • lib
  • src
  • exa
  • hlp
  • hex
  • sch
  • pcb
  • doc
mikroC PRO for AVR
  • lib
  • src
  • exa
  • hlp
  • hex
  • sch
  • pcb
  • doc
mikroC PRO for dsPIC30/33 & PIC24
  • lib
  • src
  • exa
  • hlp
  • hex
  • sch
  • pcb
  • doc
mikroC PRO for FT90x
  • lib
  • src
  • exa
  • hlp
  • hex
  • sch
  • pcb
  • doc
mikroC PRO for PIC
  • lib
  • src
  • exa
  • hlp
  • hex
  • sch
  • pcb
  • doc
mikroC PRO for PIC32
  • lib
  • src
  • exa
  • hlp
  • hex
  • sch
  • pcb
  • doc
mikroPascal PRO for ARM
  • lib
  • src
  • exa
  • hlp
  • hex
  • sch
  • pcb
  • doc
mikroPascal PRO for AVR
  • lib
  • src
  • exa
  • hlp
  • hex
  • sch
  • pcb
  • doc
mikroPascal PRO for dsPIC30/33 & PIC24
  • lib
  • src
  • exa
  • hlp
  • hex
  • sch
  • pcb
  • doc
mikroPascal PRO for FT90x
  • lib
  • src
  • exa
  • hlp
  • hex
  • sch
  • pcb
  • doc
mikroPascal PRO for PIC
  • lib
  • src
  • exa
  • hlp
  • hex
  • sch
  • pcb
  • doc
mikroPascal PRO for PIC32
  • lib
  • src
  • exa
  • hlp
  • hex
  • sch
  • pcb
  • doc

mikroSDK Library Blog

I2C 1-Wire click

I2C 1-Wire click

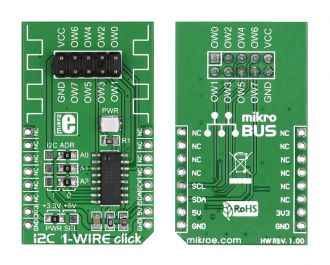
Front and back view of I2C 1-Wire Click Board designed in mikroBUS form factor.

View full image

Library Description

The library covers all the necessary functions to control I2C OneWire click board. 
Library performs the communication with the device via I2C protocol by writing to registers and by reading from registers.

Key functions:

  • uint8_t i2conewire_setChannel( uint8_t channel ) - Set the channel function.
  • void i2conewire_writeByteOneWire( uint8_t writeData ) - Generic One Wire writes the byte of data function.
  • uint8_t i2conewire_readByteOneWire() - Generic One Wire read the byte of data function.

Examples description

The application is composed of the three sections :

  • System Initialization - Initializes I2C structures and start to write log.
  • Application Initialization - Initialization driver enables - I2C, also write log.
  • Application Task - This is an example which demonstrates the use of I2C OneWire click board. I2C OneWire click communicates with register via I2C protocol by the write to register and read from the register. This example shows ID numbers for any click with OneWire protocol connected on each channel. Results are being sent to the Usart Terminal where you can track their changes. All data logs write on USB uart changes for every 1 sec.
void applicationTask()
{
    stateOfCh = 1;
    i2conewire_softReset();
    Delay_10ms();

    i2conewire_setConfig( _I2CONEWIRE_CONFIG_1WS_HIGH | _I2CONEWIRE_CONFIG_SPU_HIGH | _I2CONEWIRE_CONFIG_APU_LOW );
    Delay_10ms();

    for( cntCh = 0; cntCh < 8; cntCh++ )
    {
        i2conewire_setChannel( cntCh );
        i2conewire_oneWireReset();
        Delay_10ms();

        i2conewire_writeByteOneWire( _I2CONEWIRE_WIRE_COMMAND_READ_ROM );
        Delay_10ms();

        for ( cntVal = 8; cntVal > 0; cntVal-- )
        {
            idCode[ cntVal ] = i2conewire_readByteOneWire();

            if( idCode[ cntVal ] == _I2CONEWIRE_WIRE_RESULT_OK )
            {
                ByteToStr( cntCh, logText );
                ltrim( logText );
                mikrobus_logWrite( " Channel ", _LOG_TEXT );
                mikrobus_logWrite( logText, _LOG_TEXT );
                mikrobus_logWrite( " : No device on the channel! ", _LOG_TEXT );
                Delay_100ms();
                break;
            }
            else if ( stateOfCh )
            {
                ByteToStr( cntCh, logText );
                ltrim( logText );
                mikrobus_logWrite( " Channel ", _LOG_TEXT );
                mikrobus_logWrite( logText, _LOG_TEXT );
                mikrobus_logWrite( " : ID = 0x", _LOG_TEXT );
                stateOfCh = 0;
            }

            ByteToHex( idCode[ cntVal ], logText );
            ltrim( logText );
            mikrobus_logWrite( logText, _LOG_TEXT );
            Delay_100ms();
        }

        mikrobus_logWrite( " ", _LOG_LINE );
        mikrobus_logWrite( "---------------------------------------", _LOG_LINE );
   }
}

Other mikroE Libraries used in the example:

  • I2C
  • UART
  • Conversions

Additional notes and informations

Depending on the development board you are using, you may need USB UART clickUSB UART 2 click or RS232 click to connect to your PC, for development systems with no UART to USB interface available on the board. The terminal available in all MikroElektronika compilers, or any other terminal application of your choice, can be used to read the message.

ALSO FROM THIS AUTHOR

BATT Boost Click

0

BATT Boost Click is a compact add-on board that expands a coin battery cell's lifetime and current capability, like the CR2032 and lithium thionyl batteries. This board features the NBM5100A, a coin-cell battery life booster with adaptive power optimization from Nexperia. It is a battery energy management device designed to maximize usable capacity from non-rechargeable, primary batteries when used in low-voltage, low-power applications requiring burst current loads. The devices overcome voltage drop and battery life limitations associated with extracting high pulse currents.

[Learn More]

3D Hall 14 Click

0

3D Hall 14 Click is a compact add-on board designed for high-precision position sensing in various applications. This board features the MLX90394, a 3-axis magnetometer from Melexis based on the Triaxis® Hall technology. The MLX90394 offers low power consumption, excellent noise performance, and flexible measurement modes, including intelligent wake-up functions for efficient power management. It communicates via a standard 2-Wire I2C interface and supports fast-mode frequencies up to 1MHz.

[Learn More]

AlphaNum R click

5

AlphaNum R click is a simple solution for adding 14-segment alphanumeric displays to your device. The board carries two TLC5926 16-bit Constant-Current LED sink Drivers as well as a dual character LED 14-segment display. The board is designed to use either a 3.3V or 5V power supply.

[Learn More]