TOP Contributors

  1. MIKROE (2782 codes)
  2. Alcides Ramos (378 codes)
  3. Shawon Shahryiar (307 codes)
  4. jm_palomino (118 codes)
  5. Bugz Bensce (97 codes)
  6. S P (73 codes)
  7. dany (71 codes)
  8. MikroBUS.NET Team (35 codes)
  9. NART SCHINACKOW (34 codes)
  10. Armstrong Subero (27 codes)

Most Downloaded

  1. Timer Calculator (139604 times)
  2. FAT32 Library (72046 times)
  3. Network Ethernet Library (57274 times)
  4. USB Device Library (47638 times)
  5. Network WiFi Library (43232 times)
  6. FT800 Library (42570 times)
  7. GSM click (29934 times)
  8. mikroSDK (28319 times)
  9. PID Library (26939 times)
  10. microSD click (26312 times)
Libstock prefers package manager

Package Manager

We strongly encourage users to use Package manager for sharing their code on Libstock website, because it boosts your efficiency and leaves the end user with no room for error. [more info]

< Back
mikroSDK Library

Fingerprint 3 click

Rating:

5

Author: MIKROE

Last Updated: 2020-09-25

Package Version: 1.0.0.0

mikroSDK Library: 1.0.0.0

Category: Fingerprint

Downloaded: 2352 times

Not followed.

License: MIT license  

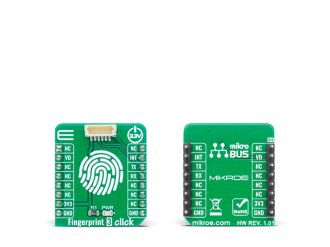
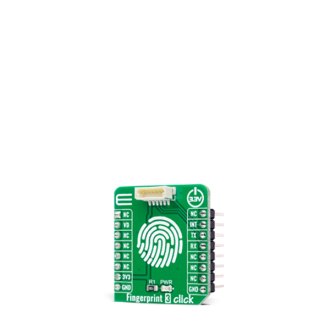
Fingerprint 3 Click is a compact add-on board that allows users to secure its projects with a biometric all-in-one optical fingerprint sensor that will make fingerprint detection and verification super simple.

No Abuse Reported

Do you want to subscribe in order to receive notifications regarding "Fingerprint 3 click" changes.

Do you want to unsubscribe in order to stop receiving notifications regarding "Fingerprint 3 click" changes.

Do you want to report abuse regarding "Fingerprint 3 click".
  • mikroSDK Library 2.0.0.0
  • Comments (0)
DOWNLOAD LINK RELATED COMPILER CONTAINS
mikroBasic PRO for ARM
  • lib
  • src
  • exa
  • hlp
  • hex
  • sch
  • pcb
  • doc
mikroBasic PRO for AVR
  • lib
  • src
  • exa
  • hlp
  • hex
  • sch
  • pcb
  • doc
mikroBasic PRO for dsPIC30/33 & PIC24
  • lib
  • src
  • exa
  • hlp
  • hex
  • sch
  • pcb
  • doc
mikroBasic PRO for FT90x
  • lib
  • src
  • exa
  • hlp
  • hex
  • sch
  • pcb
  • doc
mikroBasic PRO for PIC
  • lib
  • src
  • exa
  • hlp
  • hex
  • sch
  • pcb
  • doc
mikroBasic PRO for PIC32
  • lib
  • src
  • exa
  • hlp
  • hex
  • sch
  • pcb
  • doc
mikroC PRO for ARM
  • lib
  • src
  • exa
  • hlp
  • hex
  • sch
  • pcb
  • doc
mikroC PRO for AVR
  • lib
  • src
  • exa
  • hlp
  • hex
  • sch
  • pcb
  • doc
mikroC PRO for dsPIC30/33 & PIC24
  • lib
  • src
  • exa
  • hlp
  • hex
  • sch
  • pcb
  • doc
mikroC PRO for FT90x
  • lib
  • src
  • exa
  • hlp
  • hex
  • sch
  • pcb
  • doc
mikroC PRO for PIC
  • lib
  • src
  • exa
  • hlp
  • hex
  • sch
  • pcb
  • doc
mikroC PRO for PIC32
  • lib
  • src
  • exa
  • hlp
  • hex
  • sch
  • pcb
  • doc
mikroPascal PRO for ARM
  • lib
  • src
  • exa
  • hlp
  • hex
  • sch
  • pcb
  • doc
mikroPascal PRO for AVR
  • lib
  • src
  • exa
  • hlp
  • hex
  • sch
  • pcb
  • doc
mikroPascal PRO for dsPIC30/33 & PIC24
  • lib
  • src
  • exa
  • hlp
  • hex
  • sch
  • pcb
  • doc
mikroPascal PRO for FT90x
  • lib
  • src
  • exa
  • hlp
  • hex
  • sch
  • pcb
  • doc
mikroPascal PRO for PIC
  • lib
  • src
  • exa
  • hlp
  • hex
  • sch
  • pcb
  • doc
mikroPascal PRO for PIC32
  • lib
  • src
  • exa
  • hlp
  • hex
  • sch
  • pcb
  • doc

mikroSDK Library Blog

Fingerprint 3 Click

Fingerprint 3 Click

Native view of the Fingerprint 3 Click board.

View full image
Fingerprint 3 Click

Fingerprint 3 Click

Front and back view of the Fingerprint 3 Click board.

View full image

Library Description

The library covers all the necessary functions to control Fingerprint 3 Click board. A library performs the communication with the device via UART interface.

Key functions:

  • void fingerprint3_parser_rsp ( fingerprint3_rsp_t *response ) - Response parser function.
  • uint8_t fingerprint3_byte_ready ( void ) - Check for new byte received.
  • void fingerprint3_uart_write ( uint8_t *tx_data, uint8_t n_bytes ) - Uart write function.

Examples description

The application is composed of three sections :

  • System Initialization - Initializes UART used for communication and another UART bus used for data logging.
  • Application Initialization - Initializes UART driver, check the sensor, verify module password and then start registering a new fingerprint pattern.
  • Application Task - (code snippet) - This is an example that demonstrates the use of the Fingerprint 3 Click board. Fingerprint 3 Click stores the new fingerprint pattern which shortly after compares with new fingerprint scans for a match, infinitely. Results are being sent to the Usart Terminal where you can track their changes.
void application_task ( )
{
    if ( fingerprint3_finger_indicator( ) == FINGERPRINT3_DETECT_FINGER )
    {
        fingerprint3_buf_clear( );
        mikrobus_logWrite( "---------------------------------", _LOG_LINE );
        mikrobus_logWrite( " >>> Verification in progress... ", _LOG_LINE );
        Delay_ms( 2000 );

        fingerprint3_uart_write( &gen_img[ 0 ], 12 );
        Delay_ms( 500 );
        fingerprint3_parser_rsp( &rsp );
        Delay_ms( 100 );

        if ( rsp.confirm_code == FINGERPRINT3_OK )
        {
            fingerprint3_uart_write( &img_2_tz_2[ 0 ], 13 );
            Delay_ms( 500 );
            fingerprint3_buf_clear( );
        }

        fingerprint3_uart_write( ®_model[ 0 ], 12 );
        Delay_ms( 100 );
        fingerprint3_buf_clear( );

        fingerprint3_uart_write( &fingerprint_match[ 0 ], 12 );
        Delay_ms( 500 );
        fingerprint3_parser_rsp( &rsp );
        fingerprint3_display_match_score( );
        Delay_ms( 3000 );

        mikrobus_logWrite( "  >>> Comparing Fingerprints <<< ", _LOG_LINE );
        mikrobus_logWrite( "- - - - - - - - - - - - - - - - -", _LOG_LINE );
        mikrobus_logWrite( " Place your finger on the sensor ", _LOG_LINE );
    }
    else
    {
        fingerprint3_uart_write( &aura_led_config_purple[ 0 ], 16 );
        Delay_ms( 2000 );
        fingerprint3_buf_clear( );
    }
}


  • void fingerprint3_display_rsp ( void ) - Display response function.
  • void fingerprint3_display_match_score ( void ) - Display match score function.
  • void log_write ( uint8_t *str_buf, uint8_t str_type ) - Wrapper mikrobus_logWrite for driver function.
  • void byte_to_str ( uint8_t byte_buf, uint8_t *log_text ) - Wrapper ByteToStr for driver function.
  • void byte_to_hex ( uint8_t byte_buf, uint8_t *log_text ) - Wrapper ByteToHex for driver function.
  • void long_word_to_hex ( uint32_t long_word_buf, uint8_t *log_text ) - Wrapper LongWordToHex for driver function.

Other mikroE Libraries used in the example:

  • UART
  • Conversions

Additional notes and informations

Depending on the development board you are using, you may need USB UART clickUSB UART 2 click or RS232 click to connect to your PC, for development systems with no UART to USB interface available on the board. The terminal available in all MikroElektronika compilers, or any other terminal application of your choice, can be used to read the message.

ALSO FROM THIS AUTHOR

AudioAmp 8 Click

0

AudioAmp 8 Click is a compact add-on board that reproduces input audio signal at sound-producing output elements, with desired volume and power levels. This board features the MA12070, a super-efficient audio power amplifier from Infineon Technologies. This I2C configurable audio amplifier is based on proprietary multi-level switching technology, enabling low power loss during operation. It supports a supply voltage range from 4 to 26V, allowing it to be used in many applications. Besides, it is equipped with protection features, allowing a reliable operation.

[Learn More]

NO2 2 click

5

NO2 2 Click is a gas sensor Click boardâ„¢, equipped with the MiCS-2714, a compact metal oxide (MOS) sensor. This sensor reacts to the presence of nitrogen dioxide (NO2) and hydrogen (H2).

[Learn More]

Button R Click

0

Button R Click is the simplest solution for adding a single pushbutton to your design. The button itself is transparent, 6.8mm in diameter and has a red LED backlight. When pressed, it sends an interrupt signal to the target board microcontroller. The backlight LED is controlled separately through the mikroBUS PWM pin, so you can program all kinds of patterns (varying level of light intensity or rate of blinking on subsequent button presses). The board can use either a 3.3V or a 5V power supply.

[Learn More]