TOP Contributors

  1. MIKROE (2784 codes)
  2. Alcides Ramos (405 codes)
  3. Shawon Shahryiar (307 codes)
  4. jm_palomino (133 codes)
  5. Bugz Bensce (97 codes)
  6. S P (73 codes)
  7. dany (71 codes)
  8. MikroBUS.NET Team (35 codes)
  9. NART SCHINACKOW (34 codes)
  10. Armstrong Subero (27 codes)

Most Downloaded

  1. Timer Calculator (141515 times)
  2. FAT32 Library (74401 times)
  3. Network Ethernet Library (58914 times)
  4. USB Device Library (48964 times)
  5. Network WiFi Library (44727 times)
  6. FT800 Library (44293 times)
  7. GSM click (31003 times)
  8. mikroSDK (29861 times)
  9. PID Library (27432 times)
  10. microSD click (27410 times)
Libstock prefers package manager

Package Manager

We strongly encourage users to use Package manager for sharing their code on Libstock website, because it boosts your efficiency and leaves the end user with no room for error. [more info]

< Back
mikroSDK Library

Pedometer 3 click

Rating:

6

Author: MIKROE

Last Updated: 2018-12-10

Package Version: 1.0.0.0

mikroSDK Library: 1.0.0.0

Category: Motion

Downloaded: 4846 times

Not followed.

License: MIT license  

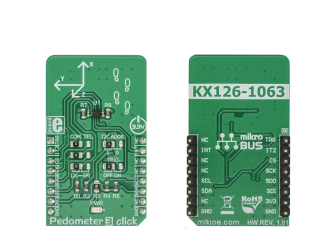
Pedometer 3 click is a three-axis acceleration sensing Click board which utilizes the KX126-1063. An advanced tri-axis acceleration sensor, KX126-1063 includes the pedometer algorithm support.

No Abuse Reported

Do you want to subscribe in order to receive notifications regarding "Pedometer 3 click" changes.

Do you want to unsubscribe in order to stop receiving notifications regarding "Pedometer 3 click" changes.

Do you want to report abuse regarding "Pedometer 3 click".
  • mikroSDK Library 2.0.0.0
  • Comments (0)
DOWNLOAD LINK RELATED COMPILER CONTAINS
mikroBasic PRO for ARM
  • lib
  • src
  • exa
  • hlp
  • hex
  • sch
  • pcb
  • doc
mikroBasic PRO for AVR
  • lib
  • src
  • exa
  • hlp
  • hex
  • sch
  • pcb
  • doc
mikroBasic PRO for dsPIC30/33 & PIC24
  • lib
  • src
  • exa
  • hlp
  • hex
  • sch
  • pcb
  • doc
mikroBasic PRO for FT90x
  • lib
  • src
  • exa
  • hlp
  • hex
  • sch
  • pcb
  • doc
mikroBasic PRO for PIC
  • lib
  • src
  • exa
  • hlp
  • hex
  • sch
  • pcb
  • doc
mikroBasic PRO for PIC32
  • lib
  • src
  • exa
  • hlp
  • hex
  • sch
  • pcb
  • doc
mikroC PRO for ARM
  • lib
  • src
  • exa
  • hlp
  • hex
  • sch
  • pcb
  • doc
mikroC PRO for AVR
  • lib
  • src
  • exa
  • hlp
  • hex
  • sch
  • pcb
  • doc
mikroC PRO for dsPIC30/33 & PIC24
  • lib
  • src
  • exa
  • hlp
  • hex
  • sch
  • pcb
  • doc
mikroC PRO for FT90x
  • lib
  • src
  • exa
  • hlp
  • hex
  • sch
  • pcb
  • doc
mikroC PRO for PIC
  • lib
  • src
  • exa
  • hlp
  • hex
  • sch
  • pcb
  • doc
mikroC PRO for PIC32
  • lib
  • src
  • exa
  • hlp
  • hex
  • sch
  • pcb
  • doc
mikroPascal PRO for ARM
  • lib
  • src
  • exa
  • hlp
  • hex
  • sch
  • pcb
  • doc
mikroPascal PRO for AVR
  • lib
  • src
  • exa
  • hlp
  • hex
  • sch
  • pcb
  • doc
mikroPascal PRO for dsPIC30/33 & PIC24
  • lib
  • src
  • exa
  • hlp
  • hex
  • sch
  • pcb
  • doc
mikroPascal PRO for FT90x
  • lib
  • src
  • exa
  • hlp
  • hex
  • sch
  • pcb
  • doc
mikroPascal PRO for PIC
  • lib
  • src
  • exa
  • hlp
  • hex
  • sch
  • pcb
  • doc
mikroPascal PRO for PIC32
  • lib
  • src
  • exa
  • hlp
  • hex
  • sch
  • pcb
  • doc

mikroSDK Library Blog

Pedometer 3 click

Pedometer 3 click

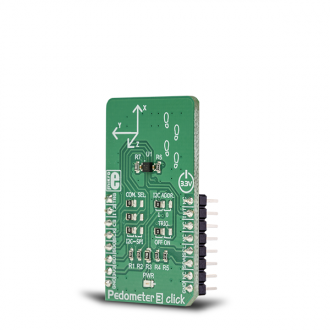
Native view of the Pedometer 3 click board.

View full image
Pedometer 3 click

Pedometer 3 click

Front and back view of the Pedometer 3 click board.

View full image

Library Description

The library initializes and defines the I2C or SPI bus driver and drivers that offer a choice for writing data in the register and reads data from register. The library includes the function for reading Accel X/Y/Z axis data, the function for reading pedometer stem counter, the function for detect Tilt and Tap. The user also has the functions for configuration device functions for reads interrupt states.

Key functions:

  • void pedometer3_getAccelAxis(int16_t *x_axis, int16_t *y_axis, int16_t *z_axis) - Functions for reading Accel axis data
  • uint16_t pedometer3_getPedometerStepCounter() - Functions for getting pedometer step counter
  • void pedometer3_getTiltPosition(uint8_t *current_pos, uint8_t *previous_pos) - Functions for getting Tilt current and previous position
  • void pedometer3_getTapDetection(uint8_t *tap) - Functions for getting Tap detection

Examples description

The application is composed of the three sections :

  • System Initialization - Initializes I2C module and sets INT pin, AN pin and RST pin as INPUT and CS pin as OUTPUT
  • Application Initialization - Initialization driver init and start configuration chip for measurement
  • Application Task - (code snippet) - Reads Accel and High Pass Accel X/Y/Z axis and detect Tilt Position. All data logs on the USB UART every 500 ms.

Note: The start configuration chip is required at the beginning of each program so that the chip wakes up and prepares for operation and measurement. What is included and set in the start-up function can be viewed in the help file.

void applicationTask()
{
    pedometer3_getAccelAxis( &X_accelAxis, &Y_accelAxis, &Z_accelAxis );
    pedometer3_getHighPassAccelAxis( &X_hpAxis, &Y_hpAxis, &Z_hpAxis );
    pedStep += pedometer3_getPedometerStepCounter();
    
    mikrobus_logWrite("|___________ Pedometer 3 click _____________|", _LOG_LINE );
    mikrobus_logWrite("|  Data    |  X axis  |  Y axis  |  Z axis  |", _LOG_LINE );
    mikrobus_logWrite("|  Accel   |", _LOG_TEXT );
    IntToStr(X_accelAxis, demoText);
    mikrobus_logWrite(demoText, _LOG_TEXT);
    mikrobus_logWrite("    |", _LOG_TEXT);
    IntToStr(Y_accelAxis, demoText);
    mikrobus_logWrite(demoText, _LOG_TEXT);
    mikrobus_logWrite("    |", _LOG_TEXT);
    IntToStr(Z_accelAxis, demoText);
    mikrobus_logWrite(demoText, _LOG_TEXT);
    mikrobus_logWrite("    |", _LOG_LINE);
    mikrobus_logWrite("| HP Accel |", _LOG_TEXT );
    IntToStr(X_hpAxis, demoText);
    mikrobus_logWrite(demoText, _LOG_TEXT);
    mikrobus_logWrite("    |", _LOG_TEXT);
    IntToStr(Y_hpAxis, demoText);
    mikrobus_logWrite(demoText, _LOG_TEXT);
    mikrobus_logWrite("    |", _LOG_TEXT);
    IntToStr(Z_hpAxis, demoText);
    mikrobus_logWrite(demoText, _LOG_TEXT);
    mikrobus_logWrite("    |", _LOG_LINE);
    mikrobus_logWrite("|___________________________________________|", _LOG_LINE );
    mikrobus_logWrite("| Pedometer step counter :", _LOG_TEXT );
    IntToStr(pedStep, demoText);
    mikrobus_logWrite(demoText, _LOG_TEXT);
    mikrobus_logWrite("            |", _LOG_LINE);
    mikrobus_logWrite("|___________________________________________|", _LOG_LINE );
    
    pedometer3_getTiltPosition(&CurrentTiltPosition, &PreviousTiltPosition);
    mikrobus_logWrite("| Current Tilt Position  :", _LOG_TEXT );
    switch(CurrentTiltPosition)
    {
        case 1:
        {
            mikrobus_logWrite("- LEFT            |", _LOG_LINE );
            break;
        }
        case 2:
        {
            mikrobus_logWrite("- RIGHT           |", _LOG_LINE );
            break;
        }
        case 3:
        {
            mikrobus_logWrite("- DOWN            |", _LOG_LINE );
            break;
        }
        case 4:
        {
            mikrobus_logWrite("- UP              |", _LOG_LINE );
            break;
        }
        case 5:
        {
            mikrobus_logWrite("- FACE DOWN       |", _LOG_LINE );
            break;
        }
        case 6:
        {
            mikrobus_logWrite("- FACE UP         |", _LOG_LINE );
            break;
        }
    }
    mikrobus_logWrite("|___________________________________________|", _LOG_LINE );
    
    mikrobus_logWrite("  ", _LOG_LINE);
    Delay_ms( 400 );
}

Other mikroE Libraries used in the example:

  • I2C

Additional notes and information

Depending on the development board you are using, you may need USB UART clickUSB UART 2 click or RS232 click to connect to your PC, for development systems with no UART to USB interface available on the board. The terminal available in all MikroElektronika compilers, or any other terminal application of your choice, can be used to read the message.

ALSO FROM THIS AUTHOR

10x10 RGB click

5

10x10 RGB Click is a matrix of 100 &quot;intelligent&quot; RGB elements, forming a 10x10 display screen. These LED elements feature internal logic, which allows them to communicate directly with the MCU.

[Learn More]

RS485 2 click

6

RS485 2 click is an RS422/485 transceiver Click board, which can be used as an interface between the TTL level UART and the RS422/485 communication bus.

[Learn More]

UVC Light Click

0

UVC Light Click is Click board™ with ultraviolet LEDs with 275nm wavelength which can be complemented with UVC Click for measuring exact dose of UV radiation. UVC radiation refers to wavelengths shorter than 280 nm. Because of the spectral sensitivity of DNA, only the UVC region demonstrates significant germicidal properties. As evident by multiple research studies and reports, when biological organisms are exposed to deep UV light in the range of 200 nm to 300 nm it is absorbed by DNA, RNA, and proteins. With two 0.7W (1.4W combined power) UVC Light Click is a perfect solution as a small surface disinfection tool.

[Learn More]